Router
This section will explain in detail the usage of Router. Router has a dedicated configuration node for customization.
"Router": {
  "RouterId": "",
  "Provider": "azure-openai",
  "Model": "gpt-4"
}
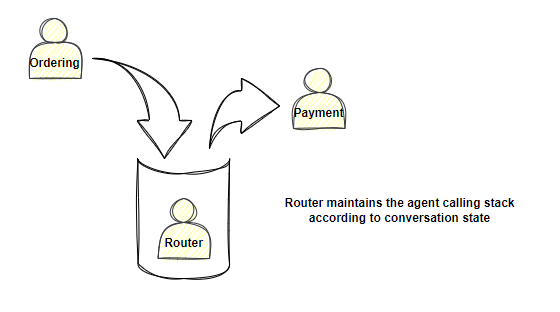
How router works
How to register agent to router?
When you add a new Agent, the Router can automatically read the Agent’s configuration, but in order for the Router to distribute the Request to the new Agent, you must set the AllowRouting attribute to True. For more information on how to use Router, please refer to the Agent/Router chapter.
Routing capability extension
If you need to expand the capabilities of Router, we only need to add the corresponding Routing Handler.
How to add custom handler?
public class TransferToCsrRoutingHandler : IRoutingHandler
{
    public string Name => "order_payment";

    public string Description => "pay the order.";

    private readonly RoutingSettings _settings;

    public TransferToCsrRoutingHandler(RoutingSettings settings)
    {
        _settings = settings;
    }

    public async Task<RoleDialogModel> Handle(IRoutingService routing, FunctionCallFromLlm inst)
    {
        var result = new RoleDialogModel(AgentRole.User, "I'm connecting the payment gateway, wait a moment please.")
        {
            CurrentAgentId = _settings.RouterId,
            FunctionName = inst.Function
        };
        return result;
    }
}
Routing - Redirection
Router will maintain an Agent call stack and automatically set the currently active Agent based on the conversation status and redirection configuration.
You can configure redirection rules based on your business needs.
{
    "routingRules": [
        {
            "field": "order_number",
            "required": true,
            "description": "pizza order number",
            "redirectTo": "c2b57a74-ae4e-4c81-b3ad-9ac5bff982bd"
        }
    ]
}